Seven segment LED

Over the holidays when gift giving was over and I could spend money again (don't ask), I made an order to both Adafruit and Sparkfun. From the latter I ordered a number of things (in later blogs) including 4 seven-segment LEDs. I mean, c'mon - they were only 95 cents.
Using my Arduino Duemilanova and protoyping kit I got one of these things working. I could display 0-9 and then turn off at the touch of a button. In the interest of sharing, here are my notes.
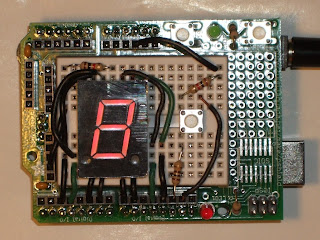
The image shows the finished product. A prototyping shield on top of my Duemilanova. On that is one of my single 7 segment LED (SparkFun COM-08546). The unit has 10 pins coming out of the back of it - 5 on top, and five on bottom. They fit nicely into a breadboard.
Eight of the pins are used to control the segments - one of those being the decimal dot to the right of the number. There is a dot to the left of it, but it doesn't do anything. One of the pins - dead center at the top - accepts voltage. According to the specs on SparkFun it should take only 2.2 volts, but I set the full 5 that the Arduino would deliver before I realized I probably shouldn't do that. It didn't blow it out or anything, but it was real bright. I put a resistor in line with one of the 5 volt outputs and this dimmed it a bit, but I still haven't figured out how to be more specific about controlling voltage/amps, etc. Probably a diode?
I wired up a switch same as described in LadyAda's tutorial because it was useful in counting presses - exactly what I wanted to do here. Each press of the button would increment the digit displayed, 0 through 9. After 9 it'd go dark and then repeat. The code I developed to accomplish this is as follows:
/*
 * SegmentLEDTest4.pde
 * Test code to tick up the display
 * along with hits to the button.
 */

// state which pin will switch
int switchPin = 13;

// establish an array for our LED pins
int ledpin[] = { 11, 3, 12, 2, 5, 8, 6, 9 };

// establish multi-dimensional array to show numbers
int numbers[][11] = {
  { LOW,  LOW,  LOW,  HIGH, LOW,  LOW,  LOW,  HIGH }, // 0
  { HIGH, HIGH, LOW,  HIGH, HIGH, LOW,  HIGH, HIGH }, // 1
  { LOW,  HIGH, LOW,  LOW,  LOW,  HIGH, LOW,  HIGH }, // 2
  { LOW,  HIGH, LOW,  LOW,  HIGH, LOW,  LOW,  HIGH }, // 3
  { HIGH, LOW,  LOW,  LOW,  HIGH, LOW,  HIGH, HIGH }, // 4
  { LOW,  LOW,  HIGH, LOW,  HIGH, LOW,  LOW,  HIGH }, // 5
  { LOW,  LOW,  HIGH, LOW,  LOW,  LOW,  LOW,  HIGH }, // 6
  { LOW,  HIGH, LOW,  HIGH, HIGH, LOW,  HIGH, HIGH }, // 7
  { LOW,  LOW,  LOW,  LOW,  LOW,  LOW,  LOW,  HIGH }, // 8
  { LOW,  LOW,  LOW,  LOW,  HIGH, LOW,  HIGH, HIGH }, // 9
  { HIGH, HIGH, HIGH, HIGH, HIGH, HIGH, HIGH, HIGH }  // off
};

// other working variable schtuff
int leds = 9;
int count = 0;
int state = HIGH;
int val = LOW;
int digit = 10;


/*
 * The "run once" setup method
 */
void setup()
{
  // set the switch pin to read
  pinMode(switchPin, INPUT);

  // set all the LED pins to output and high - in this case NOT ground
  for (count = 0; count < leds; count++)
  {
    pinMode(ledpin[count], OUTPUT);
    digitalWrite(ledpin[count], HIGH);
  }
}


/*
 * Main processing method
 */
void loop()
{
  // read the switch
  val = digitalRead(switchPin);

  // if it's pressed, or at least state has changed
  if (val != state)
  {
    // AND that state is low, or the button is DOWN
    if (val == LOW)
    {
      // increment digit
      digit = digit + 1;

      // reset if we exceeded our limit of what we can actually display
      if (digit > 10)
      {
        // reset it to zero
        digit = 0;
      }

      // show the digit
      Display();
    }

    // keep last
    state = val;
  }
}


/*
  * Given a specific value, pluck out that row
  * in the multi-dimensional array and show that
  * combination of HIGH and LOW values
  */
void Display()
{
  // loop through LED pins
  for (count = 0; count < leds; count++)
  {
    // writing on (LOW or accept ground) or off (HIGH or do not accept ground) depending on digit
    digitalWrite(ledpin[count], numbers[digit][count]);
  }
}


Comments
Post a Comment