RGB LED

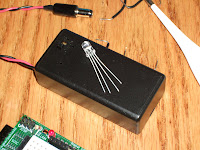
Yet another bit of fun that came with my last order to SparkFun were 10 (?) RGB LEDs. These are clear and have four leads coming off of them. They are - shortest to longest: blue, green, ground, and red.
The blue and green take 3.3v, the red takes 2v. Again, the Arduino gives us 5v on most of it's digital pins. There is a 3.3v pin, but I think that's always on. But the Arduino also makes 6 of the pin capable of PWM or Pulse Width Modulation. This is the ability to pulse that 5v on and off at certain intervals and simulate different voltages. Click the link if you want to know more.
Anyway, I set up the proto-shield using PWM and some 100 ohm resistors. While I still haven't bothered to actually calculate the proper resistance, I felt fairly certain I wasn't going to wreck the LED. My first bit of code just flipped through the 8 different combinations of colors: off, red, green, blue, yellow (red/green), aqua (green/blue), purple (red/blue), and white (all 3).
/*
* RGB LED Test 1
* Test lighting all in simple cycles.
* PWM: 3, 5, 6, 9, 10, 11
*/

// pins we'll use
int redLed = 9;
int grnLed = 10;
int bluLed = 11;

void setup()
{
pinMode(redLed, OUTPUT);
pinMode(grnLed, OUTPUT);
pinMode(bluLed, OUTPUT);
}

/*
* Main loop - light in cycles
*/
void loop()
{
lightLed(false, false, false); // off
lightLed(true,  false, false); // red
lightLed(true,  true,  false); // yellow
lightLed(false, true,  false); // green
lightLed(false, true,  true);  // aqua
lightLed(false, false, true);  // blue
lightLed(true,  false, true);  // purple
lightLed(true,  true,  true);  // white
}

/*
* Light the LEDs based on the booleans
*/
void lightLed(boolean redSet, boolean grnSet, boolean bluSet)
{
// default values to not set - no voltage
int redVal = 0;
int grnVal = 0;
int bluVal = 0;

// check booleans and set accordingly
if (redSet) { redVal = 102; } // 2.0v, 20 mA
if (grnSet) { grnVal = 163; } // 3.2v, 20 mA
if (bluSet) { bluVal = 163; } // 3.2v, 20 mA

// write what you set
analogWrite(redLed, redVal);
analogWrite(grnLed, grnVal);
analogWrite(bluLed, bluVal);

// delay for a half of a second using analog write
delay(500);

// this might cause problems being on the same timer
// as PWM, but it's all we've got
}
This was a simple proof that showed I could get all three colors with some simple mixing. Pretty, but I figured with PWM there were many other colors I could get. So I played with fading the three colors in and out with each other.
/*
* RGB LED Test 5
* Fading between colors
* PWM: 3, 5, 6, 9, 10, 11
*/

int redLed = 9;
int grnLed = 10;
int bluLed = 11;

int redMax = 102;
int grnMax = 163;
int bluMax = 163;

int pause = 50;
float step = 0.10;

void setup()
{
// set up to communication with serial
Serial.begin(9600);

pinMode(redLed, OUTPUT);
pinMode(grnLed, OUTPUT);
pinMode(bluLed, OUTPUT);
}


/*
* Main loop - light in cycles
*/
void loop()
{
float red, grn, blu;

// red on, green up, blue off
red = 1; grn = 0; blu = 0;
while (grn <= 1)   {     lightLed(red, grn, blu, pause);     grn += step;     showPercents(1, red, grn, blu);   }        // red down, green on, blue off     red = 1; grn = 1; blu = 0;   while (red >= 0)
{
  lightLed(red, grn, blu, pause);
  red -= step;
  showPercents(2, red, grn, blu);
}

// red off, green on, blue up
red = 0; grn = 1; blu = 0;
while (blu <= 1)   {     lightLed(red, grn, blu, pause);     blu += step;     showPercents(3, red, grn, blu);   }    // red off, green down, blue on     red = 0; grn = 1; blu = 1;   while (grn >= 0)
{
  lightLed(red, grn, blu, pause);
  grn -= step;
  showPercents(4, red, grn, blu);
}

// red up, green off, blue on
red = 0; grn = 0; blu = 1;
while (red <= 1)   {     lightLed(red, grn, blu, pause);     red += step;     showPercents(5, red, grn, blu);   }    // red on, green off, blue down     red = 1; grn = 0; blu = 1;   while (blu >= 0)
{
  lightLed(red, grn, blu, pause);
  blu -= step;
  showPercents(6, red, grn, blu);
}
}


/*
* Light the LEDs based on the percentages
*/
void lightLed(float redPer, float grnPer, float bluPer, int wait)
{
// default values to not set - no voltage
int redVal = redMax * redPer;
int grnVal = grnMax * grnPer;
int bluVal = bluMax * bluPer;

// write what you set
analogWrite(redLed, redVal);
analogWrite(grnLed, grnVal);
analogWrite(bluLed, bluVal);

// delay for a given milliseconds
delay(wait);
}

void showPercents(int state, float redPer, float grnPer, float bluPer)
{
Serial.print("State: ");
Serial.print(state, DEC);

Serial.print(", red: ");
Serial.print(redPer*10, DEC);

Serial.print(", grn: ");
Serial.print(grnPer*10, DEC);

Serial.print(", blu: ");
Serial.print(bluPer*10, DEC);

Serial.println(".");
}
This was a bit more satisfying to watch. So I decided to make another video of it:
I had, of course, decided not long after doing this that I should hook in the accelerometer (I can't leave that thing alone, can I?).
But I'll leave that for another post.


Comments
Post a Comment