The Skywalker Family
The origins of the idea, we think, were with our daughter Evy. She wanted to be Princess Leia this year for Halloween. She has fairly long hair & we thought we could probably do the iconic hair buns fairly easily. The outfit that goes with it would be, hopefully, simple (for Jeanette) to make. From there we figured it'd be an easy jump to get Sean outfitted as Luke.
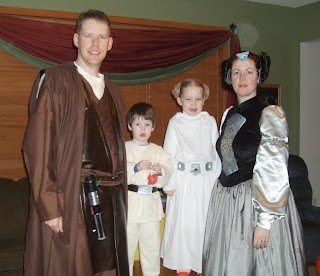
I'm not sure where the idea came from that we, their parents, should dress up as... well, their parents. We think Evy eventually decided that this would a cool thing for her parents to do. Jeanette spent many a late night at her serger sewing machine, first with their costumes and then (probably more hours) working on ours.

The result was just fantastic. I only got to wear mine twice, but I think Evy got to wear hers to 5 different events. Jeanette and Sean, both in costume, joined Evy on Friday for Evy's school party. We then all wore our outfits to a 40th birthday party of a friend of mine from college.
We wore them again, for the last time this year (probably), on Halloween. I took the kids out on their run for candy and got a lot of good comments. Jeanette stayed back at the house and handed out candy. Not ready to be done for the night, Jeanette kept hers on for a shopping errand that same night.
Since this project is more craft than make - and I did very little of the work - any comments on the build I'll leave to Jeanette. If I can get her to post something here.
Jeanette's Comments:
Well, I will see what I can add to the above comments to fill in more details on what turned out to be a rather large, lengthy project for me to tackle in not too long of a time. As Jim said, Evy was the one who came up with the initial idea of dressing up as Princess Leia. I thought this would be very fun and mostly easy since Leia's iconic outfit from Star Wars IV: A New Hope was fairly straight forward and uncomplicated.
The biggest worry I had to start with was how in the world I was going to get her hair to cooperate and stay contained in those buns. Being pretty young, she still has that awesome fine, slippery hair, just a step up from baby-fine toddler hair, that likes very much to slip out of its confinements starting very soon after said confinement has been implemented. I actually came up with a rather sneaky method for helping myself with this problem after going thru the motions twice using just binders (for the initial ponytails to keep her hair separated into 2 sections at either side of her head) and LOTS of bobby pins. The buns actually worked pretty well on their own for the short term and looked pretty adorable on her. However, for the day of her Halloween party at school I had to come up with another idea to help keep the hair contained for most of a day - during which I would not be present for the first several hours. My solution? I used old knee-high nylons of mine that were past their usefulness as stockings. They were just about the perfect length to go from the binders down to the end of her hair with just a little stretching to contain the ends once twisted into the buns. I had to use far fewer bobby pins (and had to poke holes thru the nylons for the pins to work properly -only minor discomfort to poor Evy during that process) and the buns stayed put remarkably well for a long period of time. It also helped that Evy's hair is a fairly light brown/dark blonde color so the stockings didn't stand out too horribly.
As for the actual outfit, I used a pattern meant for a shepherdess outfit (think church Christmas play) and implemented a few minor changes that are pretty simple for a somewhat seasoned sewer (no, I am not what I would call an excellent seamstress by any means! I simply am able to make things look like I know what I am doing more than the average person). I made sure the sleeves were loose and fairly long and the hem length was just short enough for Evy to walk around easily without too much constriction but long enough to make no mistake as to who she was dresses as. Having done a couple of other outfits in the past with various collars, I was able to add one to the pattern I used without too much trouble. It did not quite duplicate the real thing but was close enough for costume purposes. I most certainly can not take credit for figuring out how to make the hood (which is actually just a length of material, like a trapezoid, that drapes from one shoulder down and back up to the other shoulder, without being sewed in the center back like a normal hood). I found an excellent website that has pictures of every costume in the Star Wars universe (as far as I can tell) with tons of details and pictures and suggestions for creating parts of the outfits: www.padawansguide.com is the place to go! Totally awesome pics!! The material I chose was some white drapey polyester (I think) type material I already owned. Going for the cost minimization thing here! I did have to make an under dress out of another, heavier white poly-type material I had in order to minimize the sheerness and aim for some greater warmth to accommodate our usually pretty cool Halloweens here in Minnesota. The belt I made for Evy was actually rather amusing. The big metal parts all around the white leather belt were not going to be an option for a child's costume (and a little difficult for me to even think about fabricating in just under a month!) so I came up with another option. I found some silver costume vinyl at the fabric store that I thought would work well as a stand in for the larger silver metal hexagon pieces circling the belt. The white leather-like matte vinyl I actually used for the belt was a remnant that got pretty cheap. As for what is supposed to be the bubble-like parts in the center of the metal hexagons I substituted shiny silver sequin-like discs, super-glued into stacks of 4 onto the center of the silver vinyl decorations. This whole mess was then fabric-glued onto the belt. I thought it turned out looking pretty close to the real thing, for being a child's costume that is.
Sean's Luke Skywalker costume was even easier. Think pajamas! That is exactly what pattern I used for the bottoms. I then took the pattern for the top from that same set and used it as a base size guideline for creating the wrap-style top that Luke wears in Star Wars IV: A New Hope. Now, I did not make extra efforts to make all these costumes without shoulder seams (Leia's, Luke's and even Anakin's outfits all seem to use patterns that have no shoulder seams -but that would require a WHOLE lot more material than I was willing to use or spend money on), but like I said, these are costumes not replicas. I used simple natural tone muslin material which was a pretty close stand-in for the real thing. Luke's belt was similarly improvised using some dark brown vinyl I got free from a friend who had 2 yards she didn't have much use for - terrific luck on my part! The buckle was made from the same silver vinyl (double layer, wrong sides fabric-glued together, for sturdiness and shape) as Evy's belt decorations.
Jim's Anakin outfit was almost as easy as the Luke costume. Think robe and pajama bottom patterns and there you have it! Again, I wasn't looking to duplicate the outfits, just make costumes that emulate them. Anakin actually has many layers to his outfit that proved just a little challenging. The under layer was made from the same natural tone muslin as Luke's outfit, cut to wrap across the torso and hang just below the hips. The pants and next top layer was made from dark brown quilter's cotton and cut the same way, only longer at the hem, to hang mid-thigh. The tabbards (I think that is what they are called) were made from lengths of the dark brown vinyl I got from my friend. I know the real Anakin costume actually had black leather tabbards but I was using what I could get my hands on without going into the poor house! Jim being as tall as he is, had me a little concerned if I could actually get the tabbards to hang nearly to his knees like Anakin's do. Turns out the 2 yards of vinyl I got were just about perfect. The vinyl was even used to make pseudo-boots for Jim to wear to the birthday party (which had a costume contest included, which we won, natch, since many other adults were too lame to wear much in the way of costumes... just teasing guys!), but he passed on those for Halloween night since we ran out of time to get dressed if we were going to let our monkeys actually do some trick-or-treating.
Finally, we have my Padme Amidala costume. This was a major task for me to accomplish and anyone with a bit of observational powers who has seen the movies, particularly Star Wars II: Attack of the Clones, more than a couple times will notice that I took several short cuts in order to actually have a prayer of completing this dress in time for Halloween and manage to keep some semblance of sanity in the process. It must have taken me over a month to decide upon which of the numerous gorgeous choices of dresses I would try to base my costume. Being in Minnesota ruled out several gowns as too impractical without lots of outer fall/winter wear to keep me from getting hypothermic. Others were a little too elaborate for me to wish to undertake with such a short timeline, both in dress and hair.
After consulting several friends and family members, I settled on the grey and black dress Padme wears while packing up to head home after the Chancellor told her to leave Coruscant for her own safety. The dress was fairly simple in construction with just a couple of slightly elaborate decorations that I figured I could avoid trying to out right copy and instead simplify for my own costume. The hair was still going to be a little difficult to duplicate but I had a couple of ideas for that too. But first, the dress:
Sticking to my desire to keep the costs down, I chose to use mostly costume fabric, which I obtained when it was at least 1/2 price, and used one rather significant substitution. Again I used a pattern that I was able to alter a bit on my own to closely resemble Padme's actual gown. The skirt was made from a dark grey silk-essence type of material that looks like a rough silk shantung and lays very nicely over the under-skirt crinoline I made. The skirt of Padme's dress is actually pleated at the waist but I didn't have the time to dedicate to making the waist look that perfect so I simply gathered it around and sewed it to the bodice. The real Padme costume was apparently a 2-piece dress with an under-dress that had a simple tank-top attached to the slightly drop-waisted skirt with the black velvet bodice and silky sleeves as a separate overlay piece. I opted for a one-piece dress for simplicity's sake.
The sleeves were made using a light grey silky costume fabric. The material at the shoulders of the sleeves was gathered onto the bodice. In the original costume had a 2-part sleeve that was gathered around the upper part of the arm creating a full, puffy looking sleeve top. The lower part of the sleeve is gathered at the upper arm where the top part is gathered and is full down to just above the wrist where it gathers into form-fitting cuffs. I made my cuffs only 4 inches tall or so, a bit shorter than the real thing but easy for me to manage. Mine were also closed by snaps, not the half dozen covered buttons of the original. One major difference I had on my outfit, due partly to time constraints and partly to a shortage of the particular trim I chose to imitate the actual metal armbands of Padme's costume, was the presence of only 1 decorative band at the gathered upper arm of my sleeves. I chose to use a silver and black trim I found on clearance at the fabric store in place of what looks like beaded silver bracelet-type bands. Perhaps I will add on bands at a later date and fix the sleeves to be puffier in between the gathering and the shoulder.
For the bodice I ended up using some black corduroy I have had for many years as velvet is pretty pricey. I did not end up turning the bodice into a corset-style top with boning and all the works (as the real thing is) due to time constraints so it wasn't as closely form fitting as I would have liked but it did look pretty nice with its princess seams and shape. I managed to free-form the collar to add onto the top of the bodice with rather impressive results, if I do say so myself. The front had a placket opening that I chose to put snap closures on for ease of creation and dressing. The decorated front overlay placket proved a bit of a challenge. In the real costume the placket is made from what looks like cut of brocade-type of material that is embroidered and beaded rather elaborately. Uh, yeah, not going to happen on my costume. My sister-in-law and I came up with the idea of using fabric paints to closely mimic the beading pattern. I cut a piece of the silver vinyl and a piece of the grey silky costume material I used for the sleeves and fabric glued them together to give it a somewhat firmer structure. After that, I simply laid out my cut piece and had a close-up picture of the actual placket next to it for reference. From that I was able to create a design that was similar with glittery blue fabric paint playing the part of the turquoise beads. I included silver, gold, and shimmery white fabric paint to complete the look of beaded loveliness.
Comments
Post a Comment