Atiny85
A while back I ordered an Attiny 2313 from Adafruit. Along with it I ordered a USBtinyISP to program it. For whatever reason I could never get the thing working.
The process involved downloading AVRDude, WinAVR, and various steps of setup. After getting everything installed & following the instructions carefully, I still couldn't get it to work. I did submit some questions on Adafruit's forum & got some answers, but I suspect the problem was either I'd made a mistake in assembling the USBtinyISP or just my general lack of understanding of what was going on. It was also possible I'd wrecked the chip, so I gave up after a while.
Later I decided it might have been better to take myself out of the equation, so again I ordered another programmer and some chips, this time from Sparkfun: a Pocket AVR programmer, another Attiny 2313 and an Attiny85. So far I've not gotten around to trying out their AVR programmer & until recently the chips stayed in their wrapping.
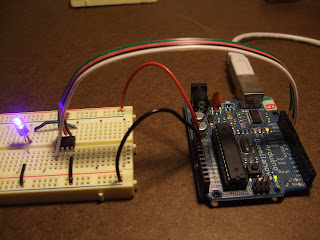
Recently I ran across an article from MIT outlining how to program the Attiny85 with an Arduino. I'd heard about people doing this before, but never really looked into it. After reading this article, though, it seemed easy. So I tried it.
It worked, though there was one item of confusion from the article. It said I'd need a capacitor between the reset and the ground on the Arduino, but only if I was using an Uno. Not something I'd need on the Duemilanova. Not true. I could not get the thing working right until I dropped a capacitor between the two. It said I'd need a 10 uf capacitor, but since I wasn't sure what exactly I had I just tried something. Worked fine.
The article started me off with the basic blink out of the Arduino examples. Instead of using pin 13 you use 0:
I'd recorded a video of this but won't post it here because, well, blink? Boring.
What I wanted to do with this instead was Morse code. I'd remembered an idea a friend of mine had about building a simple Christmas tree ornament with something like this. Something that blinks "Happy Holidays" or some such in Morse code. Not only would it be an opportunity to program something other than an Arduino, but also an excuse to maybe silk screen and etch a circuit board. You know, something that looks like a tree? Or a radio tower?
A (very) quick search on Google revealed a simple Java Morse code translator. A little reading after that revealed International Morse code would probably best with a Farnsworth speed of 20 words per minute. My timings are probably off by more than a bit on this as I was using a watch and some guesswork. But here's code that'd get the LED to blink "Happy Halloween" in Morse code:
The process involved downloading AVRDude, WinAVR, and various steps of setup. After getting everything installed & following the instructions carefully, I still couldn't get it to work. I did submit some questions on Adafruit's forum & got some answers, but I suspect the problem was either I'd made a mistake in assembling the USBtinyISP or just my general lack of understanding of what was going on. It was also possible I'd wrecked the chip, so I gave up after a while.
Later I decided it might have been better to take myself out of the equation, so again I ordered another programmer and some chips, this time from Sparkfun: a Pocket AVR programmer, another Attiny 2313 and an Attiny85. So far I've not gotten around to trying out their AVR programmer & until recently the chips stayed in their wrapping.
Recently I ran across an article from MIT outlining how to program the Attiny85 with an Arduino. I'd heard about people doing this before, but never really looked into it. After reading this article, though, it seemed easy. So I tried it.
It worked, though there was one item of confusion from the article. It said I'd need a capacitor between the reset and the ground on the Arduino, but only if I was using an Uno. Not something I'd need on the Duemilanova. Not true. I could not get the thing working right until I dropped a capacitor between the two. It said I'd need a 10 uf capacitor, but since I wasn't sure what exactly I had I just tried something. Worked fine.
The article started me off with the basic blink out of the Arduino examples. Instead of using pin 13 you use 0:
/*
  Blink
  Turns on an LED on for one second, then off for one second, repeatedly.

  This example code is in the public domain.
 */

void setup() {
  // initialize the digital pin as an output.
  // Pin 13 has an LED connected on most Arduino boards:
  pinMode(0, OUTPUT);
}

void loop() {
  digitalWrite(0, HIGH);   // set the LED on
  delay(1000);              // wait for a second
  digitalWrite(0, LOW);    // set the LED off
  delay(1000);              // wait for a second
}
I'd recorded a video of this but won't post it here because, well, blink? Boring.
What I wanted to do with this instead was Morse code. I'd remembered an idea a friend of mine had about building a simple Christmas tree ornament with something like this. Something that blinks "Happy Holidays" or some such in Morse code. Not only would it be an opportunity to program something other than an Arduino, but also an excuse to maybe silk screen and etch a circuit board. You know, something that looks like a tree? Or a radio tower?
A (very) quick search on Google revealed a simple Java Morse code translator. A little reading after that revealed International Morse code would probably best with a Farnsworth speed of 20 words per minute. My timings are probably off by more than a bit on this as I was using a watch and some guesswork. But here's code that'd get the LED to blink "Happy Halloween" in Morse code:
/*
 * Morse Test 1
 * Blinks an LED in Morse code.
 */

void setup()
{
  // initialize the digital pin as an output
  pinMode(0, OUTPUT);
}

void loop()
{
  dit();  // H
  dit();
  dit();
  dit();

  dit();  // A
  dah();

  dit();  // P
  dah();
  dah();
  dit();

  dit();  // P
  dah();
  dah();
  dit();

  dah();  // Y
  dit();
  dah();
  dah();

  space();
  space();

  dit();  // H
  dit();
  dit();
  dit();

  dit();  // A
  dah();

  dit();  // L
  dah();
  dit();
  dit();

  dit();  // L
  dah();
  dit();
  dit();

  dah();  // O
  dah();
  dah();

  dit();  // W
  dah();
  dah();

  dit();  // E

  dit();  // E

  dah();  // N
  dit();

  space();
  space();
  space();
  space();
}

void dah()
{
  digitalWrite(0, HIGH);
  delay(375);
  digitalWrite(0, LOW);
  delay(125);
}

void dit()
{
  digitalWrite(0, HIGH);
  delay(125);
  digitalWrite(0, LOW);
  delay(125);
}

void space()
{
  delay(500);
}
And here's a video of that in case: a) anyone's watching, and b) they care to attempt to translate what I coded.
Here's another video with another message which I'll leave as a mystery for someone to figure out. The message actually plays twice since as I recorded it I didn't catch the first message end separation (about 2 seconds) and turn off the camera in time. So I just let it run through the message again as it repeated. Might have been easier to just put the message in the setup method instead of the loop.
I should also point out the reason I like this so much is because I can use the Arduino IDE to do all the work. No coding in C or using programmers or command line code. It is much easier. I'm hoping (have not checked) that I can program an Attiny 2313 this way as well. I have also seen some articles outlining how to build a shield to handle this, though I'd probably create one for the 45/85 and another for the 2313.
Now that I've got this much figured out I may take this a step further & see if I can etch a circuit board for this. It'd also be cool to include some voltage handling to keep the power to something reliable and then get voltage from a light string directly. Kind of like ornaments you can get from Hallmark or wherever that plug right into the string & are lit. Might be cool.
Though if I am smart I should probably also include a switch that either turns the LED off or leaves it on all the time as the intermittent blinking might get on people's nerves after a while...


Comments
Post a Comment