DrawBot
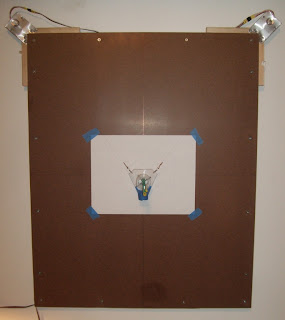
A while back I ran into an article on Make about a Vancouver maker named Dan Royer. The article talks about a kit for something called a DrawBot. The DrawBot uses two stepper motors hung at the upper corners of a flat board. On the steppers are spindles of mono-filament line (fishing line) and between them is a pen. On the board is paper. Running the steppers is an Arduino and a Motorshield.
The goal? Have the computer (connected to the Arduino) tell the Drawbot to draw something on the paper. Brilliant, right? Check out his site for videos of the DrawBot doing it's thing. Very cool.

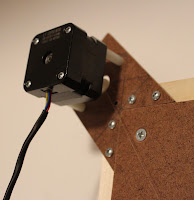
It's worth mentioning while I'm next to the picture here how I got the spindle on. It's a plastic sewing bobbin with a wooden dowel super-glued through the middle. The post coming out of the stepper is quite small, so I just drilled a slightly smaller hole in the dowel and then pressure-fit the stepper on. It worked fairly well and isn't noticeably off-center.
As you can see, the steppers do have some information on the side, but a I suspect its not a type of stepper currently in production. I found the Minebea company does sell steppers, but there are no data sheets available for the stepper I've got.
The goal? Have the computer (connected to the Arduino) tell the Drawbot to draw something on the paper. Brilliant, right? Check out his site for videos of the DrawBot doing it's thing. Very cool.
The sketch on the Arduino is code written by Dan that is essentially a G-code interpreter. It'll take instructions sent to it by the connected computer and direct the pen accordingly. This is something I'd been looking for: a way to learn G-code, by doing.
Seeing as I already had an Arduino. Not an Uno, mind you - a Duemilanova '328 board, but still. I also have a Motorshield, and several stepper motors, I figured I'd attempt to build one.
Home Depot has 2 by 4 foot mitre (?) board which I used almost as-is. I kept it 2 foot wide and made it 2 and a half tall. On the back are some 2 by 1 pine boards which it's hanging from.
Hung between the steppers is a sheet of acrylic I cut to size and put a hold in the middle. Onto that hole I glued an old tape roll, into which I drilled four holes and put bolts through. In the middle of these I put a pencil. At the bottom of this unit is a small roll of quarters for weight. I'll see if I can include a close-up of this in all it's awesomeness in a later post.
The steppers are bolted to some aluminum sheets I, in turn, bolted to some smaller boards. I did this so I could swap out the steppers if I needed to. Turns out I likely will.
The steppers I got for about 2 dollars a piece from Axman Surplus. Real inexpensive, sure, but I know next to nothing about them. To run the sketch, though, there's at least a few details I need to know: steps per rotation, max rpm, step delay, step angle, others. I know none of these things about the steppers I have.

It's worth mentioning while I'm next to the picture here how I got the spindle on. It's a plastic sewing bobbin with a wooden dowel super-glued through the middle. The post coming out of the stepper is quite small, so I just drilled a slightly smaller hole in the dowel and then pressure-fit the stepper on. It worked fairly well and isn't noticeably off-center.
As you can see, the steppers do have some information on the side, but a I suspect its not a type of stepper currently in production. I found the Minebea company does sell steppers, but there are no data sheets available for the stepper I've got.
So, I decided push ahead anyway. I made my best guess at the necessary settings and tried getting it to draw one of the simple images provided - no luck. It drew something, but mostly random scribbles. Bummer.
The Marginally Clever site does sell parts of the DrawBot separately, so I may see if can get the steppers and possibly other parts to get my DrawBot running. Partially because its so cool, but also because its a chance to work with G-code, something I've been wanting to learn.
This one is too cool not get working completely. My kids seem really exited about - even when it just runs and scribbles like it is now. So. More to come.


Comments
Post a Comment